Posts Tagged With: Kids

Bee Birthday and Easy Mason Jar Drink Lids (with Tutorial)

This weekend we celebrated C’s first birthday.  I ordered cupcakes from a wonderful, local, all- organic bakery that makes a to-die-for flavor called “Bee-titude.”  It’s a lavender cupcake with honey-lemon butter cream frosting, and it was the inspiration for C’s party theme: honey bee.  The party colors were yellow and lavender, and it turns out that this was a really fun theme to put together.

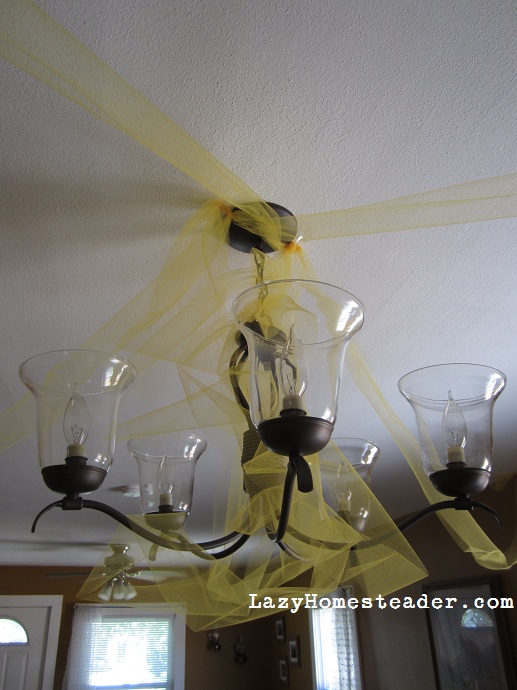
I also made a few discoveries for decorating this party that eased the green-guilt that sometimes comes along with me decorating.  I found spools of colored tulle at the craft store that I can easily roll up and reuse for another occasion instead of the crêpe paper streamers I usually use.  And I bought two yards of inexpensive broadcloth for the table-cloth that would match the party theme.

I used various glass plates and jars to decorate and filled a vase with lavender and chamomile flowers.

I have a gorgeous bee skep-shaped drink dispenser that my mom bought me for Christmas last year and I filled it with honey-lavender lemonade.  I was surprised that the lavender flowers turned the lemonade pink!

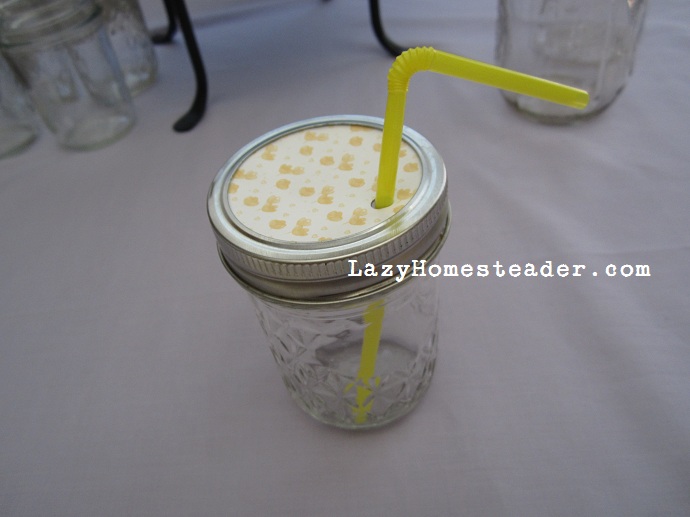
And I used my canning jars as glasses.  Pints for the adults with ribbons and tags to write names on, and half-pints with lids for the kids.  And here was my eureka moment.  Ball jelly jars are durable and their lids don’t leak.  And I used a HOLE-PUNCH to make them into drink lids.

Here’s how:

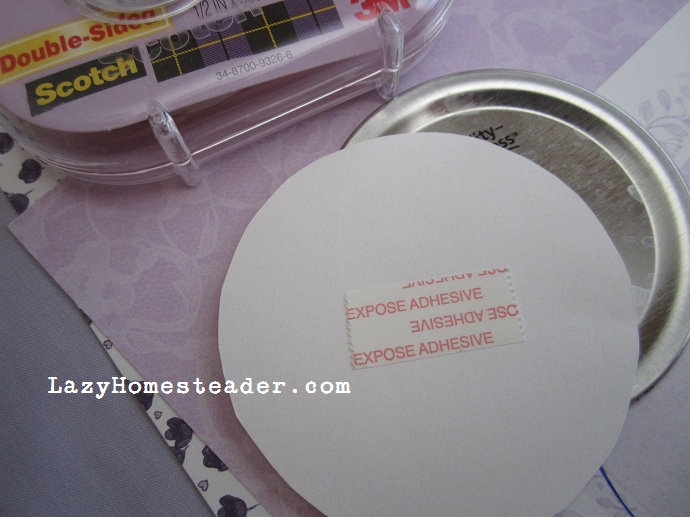
First I traced old jar lids onto patterned paper and then cut out the circles.

I used double-sided tape to stick the paper to the top of the lid.

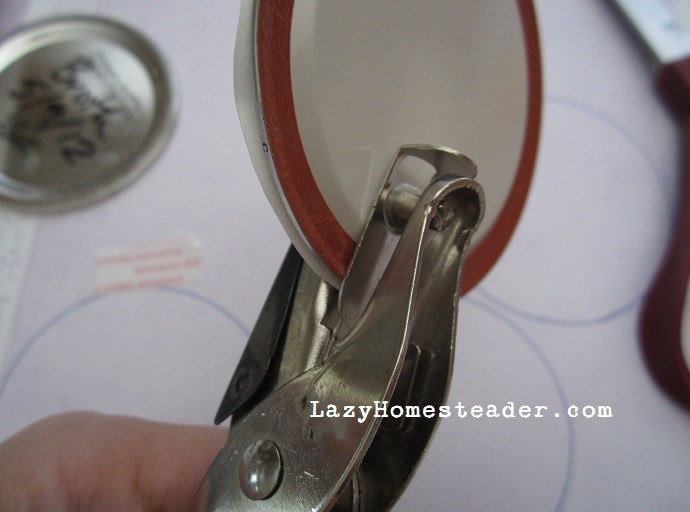
Then I used a regular old hole-punch to punch holes in the tops of the lids.  This was surprisingly easy.  I did it with one hand and minimal effort.  The punch still worked great on about twenty paper tags after punching six lids.

I used a cheapy plastic straws with about an inch cut off the end to make the kids’ tumblers complete.

Not a single jar got broken between six, three- to seven-year-olds.  They even took them outside.  I wrote each kiddo’s name on the top of their jar, so there were no mix-ups.  It was really easy and completely free, since I had all these supplies lying around the house.  Henry even helped cut out the circles.

I plan to just swap out the paper circles and straws for the next party.

Categories: DIY, Simple Living, Thrift | Tags: , , , , , , | 15 Comments

Getting Kids to Eat Their Veggies

This weekend our boys, once again, amazed friends by eating vegetables.  And it wasn’t even pizza. They ate winter squash, green beans, salad (with garlic, cilantro and cabbage), sliced kolhrabi, beets…

We always get comments on this, apparent, oddity.  Our five-year old and two-year old beg us for carrots and green beans.  I’ve been known to complain to my sister that H ate all  the carrots and now I don’t have enough for tonight’s dinner.  And I’ve had to hide tomatoes from them.

People always ask how we got them to be this way.  My number one rule is that I’m not a short order cook.  What I make for dinner is what we all eat together.  No exceptions.  Besides that, here are my tips on how to get your kids to eat their vegetables:

  1. Grow Veggies.  It is cool to see something go from seed to plant to fruit to table.  Let them plant.  Let them water.  Let them harvest.  I betcha they’ll eat it.  If I ask H which vegetables taste the best, the ones from the garden or those from the store, his answer is not surprising… the garden!
  2. Let Them Shop.  After the garden, H likes vegetables in this order:  “The Farm” (our CSA), the farmer’s market, then the store.  He loves knowing where his food comes from.  Our dinner conversation typically involves some, “where is this from” Q & A.  He is more invested in the farm vegetables, because he has seen the ground it was grown in.  The farm is fun.  He like the farmers market because we talk it up, and because he usually gets to pick something out to take home.  But even at the grocery store, he gets to weigh in on choices.  “Would you rather have kale or broccoli for dinner this week?”  Making a choice, gives them an investment in eating the vegetable later.
  3. Let them cook. Even little kids can pull up a step stool and wash carrots and potatoes.  Older kids can stir the onions as they sauté.  If they’ve helped make it, they are more likely to want to help eat it.  Putting work into it makes it more appealing.
  4. Eat YOUR Veggies.  Kids don’t buy the “do as I say, not as I do” garbage.  They will do what you do.  If I hear my kids saying something I don’t like, chances are they heard it from me first.  Same goes for food.  If you don’t like something, only eat a bite or two.  But eat some, and eat it with a happy face.  This applies to your partner too.  If Dad doesn’t want to eat the green stuff, you kids probably won’t either.
  5. Offer Veggies.  I know that I’ve already grown tired of hearing “Can we have a snack?”  But I know I can grab the bag of green beans from the ice box and they can go to town.  This is because I say, “Sure, would you guys like green beans or carrots?”  They usually say yes to both.  If I offered green beans or bunny crackers, they’re going to pick the crackers.  So I don’t offer the crackers.
  6. Remember, Tastes Change. Remind them of that too.  Just because they didn’t like it last time, doesn’t mean they won’t like it this time.  Babies and children need to try foods several times before they really know if they like them or not.  At every meal, they have to at least try every thing that is served.  This is good practice as adults too, and it’s great for teaching good manners as a dinner guest – just because you don’t like Mom’s potato salad, doesn’t mean you won’t like Mrs. Dickinson’s.  You need to at least try a bite.  It’s polite, and you might be surprised.
  7. Don’t Buy Junk.  Just don’t.  If potato chips aren’t available, they’ll eat an apple instead.  You will too.  😉

The recurring theme here is investment.  The more work they put into their food, the more they will want to get out of it.  And you can’t argue with delicious results.  We don’t draw battle lines with food, but we do negotiate.  This summer, the only vegetable H really didn’t like was zucchini.  That was tough at first.  I still made lots of zucchini.  But at every meal, I told him, he didn’t have to eat all of it, but he had to try it.  By the end of the summer, he had no problem with it.  It still wasn’t his favorite.  I put one into a late ratatouille, and when he asked for seconds, he said, “but no zucchini, please.”  I’m ok with him picking it out, especially on seconds.   Especially because he ate some with his first serving.

It’s not automatic.  We still have to remind them to try things.  Sometimes although I offer two veggies, they ask for crackers.  But generally, it works.  You too can amaze your friends!  😉

Moms, what are your tips for getting the greens into your kids?

Categories: CSA, Food, Garden, Top 5 | Tags: , , , , , | 8 Comments

Handmade Halloween – No Sew Pterodactyl Tutorial

Last year I posted two Halloween costume tutorials and they were a big hit.  In fact, they’ve been the biggest hits on this blog for the last month or so.  But last year, the costumes were easy.  E was a garden gnome, and H was a bat.  This year, H upped the ante – he wants to be a pterodactyl.

A pterodactyl.  Seriously.  How am I supposed to make that?!  H certainly keeps me on my toes.  Here’s what we came up with.

You’ll need:

  • a large piece of poster board
  • approx. one yard of fleece fabric (or an amount that will fit your kid’s arm-span)
  • hot glue gun and glue
  • scissors and hole-punch
  • duct tape, preferably in a fun color
  • five 9″x12″ pieces of felt in a variety of colors.  I used 2 red pieces, 2 orange pieces and 1 yellow piece.  These are not pictured.
  • a helper who wants to be a pterodactyl

Originally I was going to use spray paint to decorate the costume, but after trying it on some scraps, I decided to go with felt instead.  Just disregard that can of paint there.  😉

So, the Ptutorial:

Roll the poster board into a cone shape, centering the bottom point over your kiddos eyes and making sure he can still see.  Tape the cone so that it will be the correct size to fit his head.  This will be sort of a hat.  A cone-hat.  It’s ok if there is a little wiggle room, since you will be making ties that will be on the inside of the cone-hat.


Punch two holes in the cone-hat near your kid’s ears, using duct tape to reinforce them (the holes, not the ears).  Keep in mind that the back of the cone-hat is heavy, so the holes will need to be in a place that will keep it balanced on his head.  Also keep in mind that he has hair under the cone-hat where you are punching the holes – unless you want to give him a weird hole-punch hair cut.  Yep, that’s the way we roll.

Cut the salvage edge off your fleece.  Cut this strip in half.  Cut one half in half again, and set the other half aside.

Thread the two pieces of the first half through the holes in the cone-hat.  Knot them on the outside.  Use a piece of duct tape to secure the knots to the side of the hat, so they will be as flat as possible, but won’t slip through the holes.


Wrap the tip of the cone-hat in duct tape.  Extend the tape past the end of the cone and give it a bit of a curve.

Cut your fleece in half along the fold so that you have two relatively square pieces.  Mine were each a yard long.  Use one piece to wrap your cone-hat.  I let a bit hang over the edge in the back of the hat, so none of the poster board would show.  Use the hot glue gun to secure the fleece to the poster board, trimming off any excess fleece as needed, and making sure your curved duct tape tip pokes through the top.


Where the fleece overlaps the point on the front of the hat, fold it over and glue it to the underside of the poster board with the glue gun.

Your hat should now look like this:

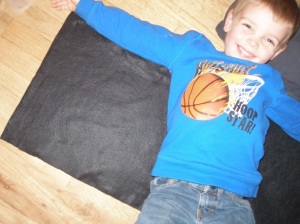
Set your hat aside and have your kiddo lay down on the second piece of fleece. I took this picture and then decided to turn the fleece the other way, 90 degrees.  So the wings will be wider, rather than longer.  Make sure your kid is at the very top of the fleece, and then mark where his armpits are and cut two slits in the fleece, about two inches long.  Fleece is very stretchy, so don’t cut these too big, or too close to the edge.


About two inches in from the edges (where his hands would be) cut two more slits about an inch to an inch and a half apart for each hand.  Again, not too big, they will stretch.

Cut the bottom of the fleece into a wing shape.  Folding it in half makes it symmetrical.


Have him put his arms through the armpit holes like he was putting on a jacket, then his hands through the hand holes so that his wrists are through and he can grip the fleece in each hand.  Now, measure where his waist is and cut two small slits about two inches apart in the center of the wings.  Thread the second half of the salvaged edge strip through these holes so that the long ends can tie around your kid’s waist.

The wings should now look like this (H is holding them up – not wearing them yet):

Now, using the felt, make dinosaur-like designs to decorate your wings and hat.  This is easy, since no one knows what dinosaurs really looked like!  We did these oval, spot thingies for the back/outside of the wings.


And wavy, red and orange stripes for the front/inside of the wings and for the hat.  Attach all your felt decorations with hot glue.

Now, dress your kid in some dinosaur-hue clothing appropriate for the weather where you trick-or-treat.  We used brown pants that we already had, and a greenish shirt.  If I can track one down before the 31st, I might have him wear a yellow shirt instead, because every knows pterodactyls wear yellow shirts

Have your kiddo thread his arms through the wings, tie his belt (under his shirt), and tie on his hat.  Notice that I covered the back of the belt with a dino-spot.

Voilà – pterodactyl!

Ka-kaw, ka-kaw!

Happy Halloween!

Oh, and if you are like me, you should just buy double the fleece you need, because you are going to make the first wings too small.  But this is actually a good thing, since all pterodactyls live in family groups…

Categories: DIY, Thrift | Tags: , , , , , , | 9 Comments

20 Weeks: The Boys Closet – Cleaned!

Welcome to my weekly update of my 20 Week Organization Challenge.  I’m on week 3!  This week I completed organizing the “Boys Closet Shelf,” which included storing their extra bedding.

We bought matching beds for the boys and once they are set up, we will lose the four drawers under H’s current bed.  I was using two of the drawers to store spare sheets and blankets and two to store the clothes H’s outgrown that we are saving for E.

Last week I tackled the boys toy storage in their closet.  Moving everything to the cubby-shelf freed up the four baskets that were on the floor.  I figured these would be perfect for the job.  I promptly filled them all up with bed linens and clothes.  Also we’d just been shoving the spare mattress pads (and other random junk) up into the corners of the closet shelf, since they wouldn’t fit in the drawers.

Here’s what THAT looked like:

The baskets, now full of sheets, clothes and mattress pads went onto the upper closet shelf, next to the toys I was already keeping put up high in matching baskets (like playdoh, paint and puzzles).  They all have tags so I can see which basket I need to pull down when it’s time to change the bed. I also found a space in the cupboard above the washer just outside their room for the humidifier, and I took some things out of the closet that didn’t belong in there to start with, like that box of cloth diapers for the new baby.

The result: Seven labeled baskets across the top of the closet, and no more random things shoved into the corners.  Nothing will fit up here but the baskets.  And they look great!

Voilà!  Another item crossed off the list!  “Boys Closet Shelf.”   I didn’t really realize how easily this project and last week’s project would perfectly roll into one.  But yay!  And bonus points for not buying anything new to organize that top shelf with!  Though fewer points, since I clearly bought that hanging organizer thingy for E’s clothes.

On the note of buying things, I wanted to share with you one of my favorite blogs: The Crunchy Chicken.  Last week she blogged about being Trapped By Your Possessions, and her past years’ Buy Nothing Challenge.  It’s a great idea and one I’d love to participate in, but I’m afraid with baby on the way I’d bomb-out completely.  I am going to try to limit my unnecessary purchases (more then we already do, that is).  But as I commented on her post, although I can’t promise not to buy anything right now, I can promise to purge until it fits!

How have you been finding ways to organize your spaces?  Have you made a list?  Have you crossed items off yet?

This post is part of the Organizing Junkie blog party!
To see what I’ve done in the last three weeks, check out my other 20 Weeks posts!

Categories: 20 Weeks of Organizing | Tags: , , , | 19 Comments

Stop Swallowing Watermelon Seeds and Other Goals for 2011

I may look like this soon.

So twelve weeks (plus or minus a bit) ago, I swallowed a watermelon seed.  This Friday we should be able to hear the heartbeat.  Yep, you read that right.  We are knocked up with number three here.

I was going to post those pictures that women take showing their growing belly, and I thought it’d be fun to take one every few weeks or so, so you could all see the progress.  But then my higher reasoning kicked in and said – Uh, it’s just not as cute the third time, and really does everyone want to see that, and most importantly, do you really think you can handle that type of commitment and level of laughter?

So you get my artistic rendering here instead.

We are excited, and well into the figuring-out-where-exactly-we’re-going-to-put-another-one phase.  We are planning another home birth, and despite everyone’s urging, we will be perfectly happy with another boy.  Three was not exactly planned, so it’s not like we were going for a girl or anything.  We’re fine either way, though our families are clearly already dreaming in pink.

On another note, as of last week, we no longer have Josie.  This was an excruciatingly hard decision for us, quite painful, and I will probably blog all about it at some point, but I’m just not ready yet.  She’s been missed terribly already and even typing these few lame sentences gets me choked up, so that’s all I have to say about it right now.

Besides giving birth this year, I do have a few other goals.  I’m not really the resolution type, but there are a couple of things I want to do different or better.  You probably thought things were crazy enough as it was around here (I know I did!), but it’s one of my goals this year to blog more frequently.  I joined wordpress.com’s Post-A-Week challenge, and even found myself a blogging buddy.  So look for more updates more often – baby ones included here on the blog.

We’ve been discussing a community type of gardening arrangement with our neighbor and a few friends this summer, and we’ve done some prep work and ordered seed catalogs.  This is a big project and I plan to tell you all about it this year.  I’m very excited!

It’s also a goal of mine to get our back yard patio completed.  We started collecting sandstone flags for it last summer.  We have a way to go, but I’d like to see it done before baby comes.

There are some other things too, but this first trimester thing has me worn out and nap time is looking pretty prime right now.  In all, I’m looking forward to 2011.  A lot of changes this year already, and I’m sure many more.  But I hope they will all be good, even if they’re not all easy.

Until next week (if not sooner)!

Categories: Childbirth, Community | Tags: , , | 7 Comments

Handmade Halloween – Bat Tutorial

Since last week I posted a tutorial for sewing a homemade garden gnome costume, I thought I’d share how I made H’s bat costume for this Halloween as well. This costume was also very inexpensive to make, and very easy.  It took me about 2 hours total, including trying to keep E distracted from pushing the stitching buttons on the sewing machine and away from the straight pins. Click the pictures for close-up views.

I started with a black jacket from Goodwill ($1.99) and took it with me to the fabric store.  Using the jacket as a reference, I bought 3/8 of a yard of black felt ($1.58) .  With the material folded in half, I had H lay on the felt with his arm outstretched and used straight pins to mark his wrist, elbow, armpit and waist.

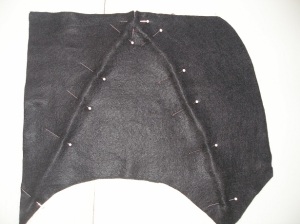
Cut a wing shape using these measurements.  You could mark the felt with chalk, make a paper template, or freehand it (I just eyeballed it).  With the jacket zipped up, pin felt to the arm and side seam of the jacket.  Flip the jacket over and trim away any extra felt.  (I love that this jacket has a reflective patch on the back hem – good for trick-or-treating).

Unpin the felt from the jacket, but keep the pin marking the elbow in place.  You now have one wing that is two pieces of felt.  Use this as a guide to cut another two pieces of felt for the other wing, and mark where the elbow will be on the second wing.

Working with one wing at a time, twist together some pipe cleaners (77 cents for 25).  I used seven for each wing.  Center the… uh, stem(?) of the pipe cleaners at the pin that marked the elbow, between the two layers of felt.  Pin the pipe cleaners in place.
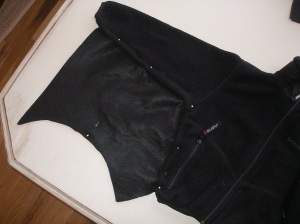
Bend pipe cleaners so that they make lines out to the points of the wings and pin securely between felt pieces.

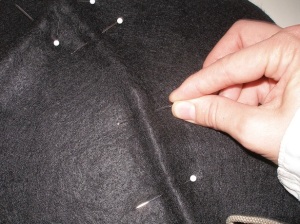
Top-stitch both pieces of felt together, starting with the outside edges.  Then top-stitch on either side of each pipe cleaner. It might be fun to use contrasting thread so you can see the stitching.  Repeat this on the second wing.

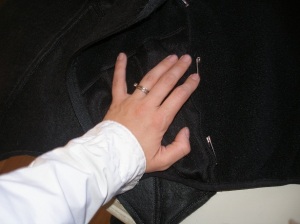
Now you will secure the wings to the jacket.  You could sew them in place, use hot glue, or if you want to reuse the jacket later, use safety pins.  I used safety pins.  I pinned the jacket at the wrist, elbow, armpit, waist and hem.  Then I had H try on the jacket, adjusted the wings as needed and added more safety pins.

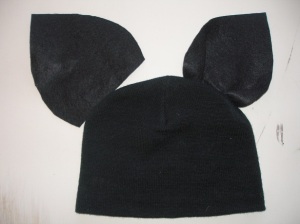
For the bat ears, I cut two pieces of felt in the shape of an ear.  Make sure they are big bat ears, not little cat ears!  You could do double layers of felt, top-stitched together here too, but I was running out of nap time and patience with Emmett, so mine are only one layer thick.  Pin and stitch pleats into each ear.  You might want to experiment with one or two pleats, etc.

Pin the ears to a black knit hat ($1.50 new).  Flip the hat over a stitch the ears on.  Alternatively, you could hot glue or pin the ears in place.

Ta-da!  A bat costume for $5.84 plus tax.  If you’re keeping tally, that’s $9.53 for two Halloween costumes this year.  If you could find a black hoodie at Goodwill instead of a jacket and a hat, that would save you even more.

When the 31st rolls around, H will wear his costume with black pants too.  He loves his costume – just what he wanted.  What are you doing for Halloween?  Do you dress up?  Are you making homemade costumes?  Carving pumpkins?

Note:  Please feel free to share this tutorial on your own blog, just include a link back here!  Thanks!

Categories: DIY, Thrift | Tags: , , , | 12 Comments

Handmade Halloween – Garden Gnome Tutorial

Last year, we found the funniest costume and we really wanted it for E (who has earned the nickname “Angry Elf”).  But we couldn’t find it in E’s size.  This year, Target is carrying the costume – for $20.

Basically these are brown and plaid, super-thin pajamas with a felt hat, fake beard and felt booties.  TWENTY dollars!?!?

So, I tried my hand at making it myself.  E already had hand-me-down green corduroy overalls and a red plaid shirt from H, so that part was easy.  Turns out, the rest was easy too.  Click the pictures for a closer view.

I got four pieces of 9×12″ felt for a dollar at Hobby Lobby.  Make that seventy cents – since it was my lucky day and the felt was 30% off.  And a piece of white craft fur for $2.99.

Step one: using two pieces of felt, trace and cut out hat shape.  Make sure to leave a seam allowance and that the brim will fit your babe’s noggin, plus a little wiggle room since the beard will be sewn into the hat.  I had to sew in little extra felt triangles since E needed just slightly more than 18 inches (pictured later).  Trace a beard shape on the back of the craft fur and cut out.  I suggest making the beard at the bottom of the piece fur so that you won’t accidentally cut the hair that hangs down at the bottom too short.

Step two: Cut two eyebrows from scraps of the craft fur.  Trim them to be a bit shaggy and then pin them to the front of the hat.  Sew eyebrows on.

Step three: If you need to add a bit of felt to make the brim fit your little one’s head, sew triangles to the back piece of the hat.  You can see my little triangles already attached where the beard is pinned.  Cut a six to seven-inch piece of thin elastic (I had some of this left over from a earlier project).  Center, pin and sew the elastic to the inside of the back hat piece.  Pin and sew the beard ends to the ends of the elastic.  Note that I sewed them as shown in the picture, but if I had a do-over, I’d turn the beard ends out before sewing them on so they’d lay more naturally when the hat is worn.  Details, people.  😉

Step four:  Pin the right sides of the hat together, sew and trim up any threads.  Turn right side out.  Voilà!

For the shoes, trace and cut a sole, a tongue and two sides of a shoe that will fit your kiddo on two pieces of felt (or on one piece and cut both pieces at the same time).  Give the sides a nice curl, so when it’s put together the toes will curl a little.  Cut two 1.5-2-inch pieces of thin elastic.

Sew the backs of the shoe sides together, right sides out/wrong sides together.  The seams should be showing on the outside of the shoe.  Next sew the elastic to the inside, centering with the center of the back of the shoe.  Then sew the sides to the tongue, again, wrong sides together.

You’ve just made the “upper” of a felt elf shoe.  Although, the story books would usually have it happen the other way around… the old shoemaker would be proud.  At any rate, they should now look like sole-less shoes.  Pin the soles to the upper, again, with the seams showing on the outside.  Sew the soles on.

All done.  Little gnome shoes.  Not the best to use in a house with hardwood floors, unless your gnome can’t walk.  But they will do for one night on the streets, begging for candy and creeping out old people.

Finally, dress the Angry Elf as a happy garden gnome.  And laugh all the way back to Target to return that ridiculously over priced costume.  You just made yours for $3.69 plus tax.

Note:  Please feel free to share this tutorial on your own blog, just include a link back here!  Thanks!

Categories: DIY, Thrift | Tags: , , , , | 18 Comments

Fruit

This weekend was the weekend of fruit.  On Saturday morning we went to Palisade for the second time this summer, and we came home with 319 pounds of peaches.  150 pounds were for friends, and we kept the other half for ourselves.  Then, Sunday morning, before we had even gotten a peach into the freezer, my brother-in-law came by with over 1500 Italian plums.  Thankfully the plums are a bit green, as we didn’t really have much time to mess with the fruit on Sunday.

Monday, we ate some of the plums in a plum coffee cake, and then we went to our friend’s home outside of Allenspark.  Mike grilled and we gathered around the fire pit, and had a nice evening with friends (and peach cobbler), watching the smoke from the fire in Boulder county blow over the horizon.

On the way home we stopped outside of Longmont where we could see the fire above Boulder.  My pictures here don’t do it justice, but it was incredible.

Tuesday is farm day for me, when I go and work at the CSA.  I brought home our share, and had barely pulled into the drive when our friend, Rich drove up with twenty plus pounds of concord grapes!  These grapes are our favorite and they were very generous!

So we have a fruit filled week ahead of us.  I had actually planned to pick strawberries and raspberries this week too, but I am putting that off until next week in hopes that I can get somewhat caught up around here before adding more to it!

Here’s the update:

Plant something – nothing.

Harvest something – eggs, tomatoes, zucchini, peaches

Preserve something – three batches of peach preserves, two and a half boxes (approx. 30 lbs) of peaches sliced and frozen, 3½ pounds green beans frozen, 1 gallon bag of tomatoes frozen, 2 batches of carrot soup in the freezer.

Waste Not – compost and recycling, scraps to chickens, etc.  Lots and lots went to the goodwill over the last couple of weeks.

Want Not – nothing that I can think of right now.

Build Community Food Systems – all the fruit trading!  Yum!

Eat the Food – as mentioned, plum cake and peach cobbler.  Also eating all the yummy farm veggies.  Nothing out of the ordinary.  😉

Categories: Canning and Food Preservation, Chickens, Food, Garden, Independence Days, Recommended Reading | Tags: , , , , , , , , , | 1 Comment

Blog at WordPress.com.