Posts Tagged With: Tutorial

Bee Birthday and Easy Mason Jar Drink Lids (with Tutorial)

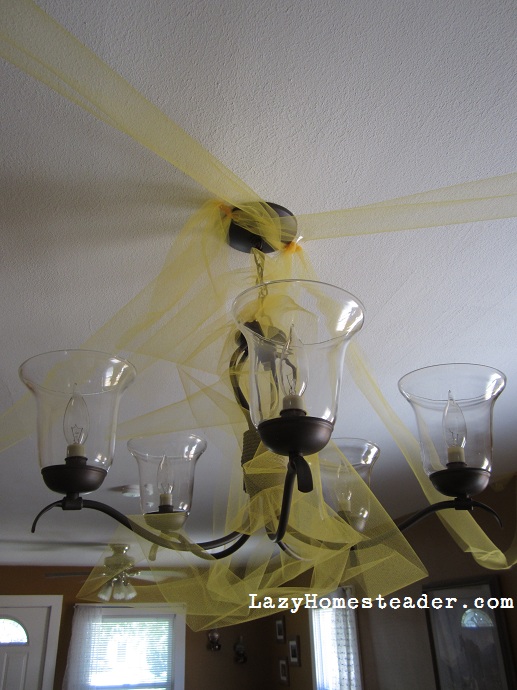
This weekend we celebrated C’s first birthday.  I ordered cupcakes from a wonderful, local, all- organic bakery that makes a to-die-for flavor called “Bee-titude.”  It’s a lavender cupcake with honey-lemon butter cream frosting, and it was the inspiration for C’s party theme: honey bee.  The party colors were yellow and lavender, and it turns out that this was a really fun theme to put together.

I also made a few discoveries for decorating this party that eased the green-guilt that sometimes comes along with me decorating.  I found spools of colored tulle at the craft store that I can easily roll up and reuse for another occasion instead of the crêpe paper streamers I usually use.  And I bought two yards of inexpensive broadcloth for the table-cloth that would match the party theme.

I used various glass plates and jars to decorate and filled a vase with lavender and chamomile flowers.

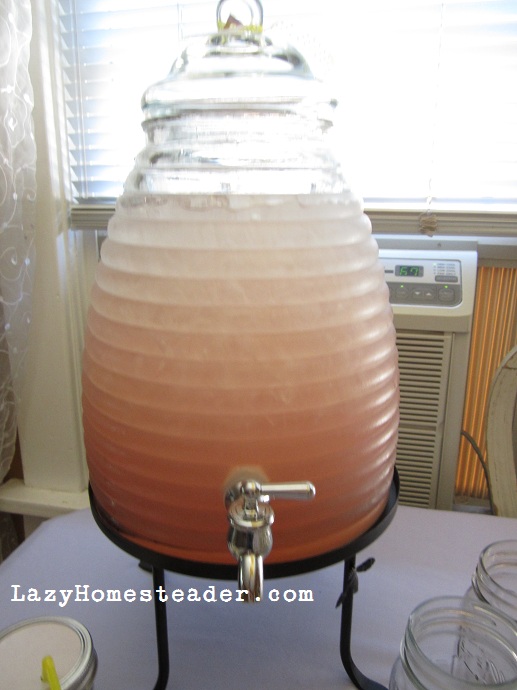
I have a gorgeous bee skep-shaped drink dispenser that my mom bought me for Christmas last year and I filled it with honey-lavender lemonade.  I was surprised that the lavender flowers turned the lemonade pink!

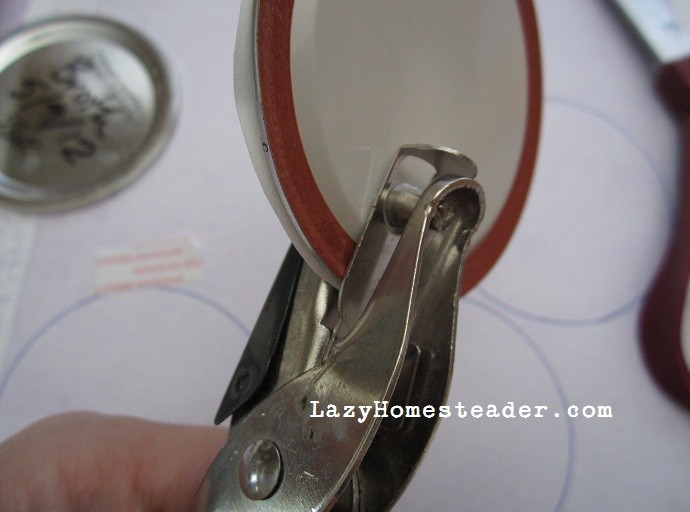
And I used my canning jars as glasses.  Pints for the adults with ribbons and tags to write names on, and half-pints with lids for the kids.  And here was my eureka moment.  Ball jelly jars are durable and their lids don’t leak.  And I used a HOLE-PUNCH to make them into drink lids.

Here’s how:

First I traced old jar lids onto patterned paper and then cut out the circles.

I used double-sided tape to stick the paper to the top of the lid.

Then I used a regular old hole-punch to punch holes in the tops of the lids.  This was surprisingly easy.  I did it with one hand and minimal effort.  The punch still worked great on about twenty paper tags after punching six lids.

I used a cheapy plastic straws with about an inch cut off the end to make the kids’ tumblers complete.

Not a single jar got broken between six, three- to seven-year-olds.  They even took them outside.  I wrote each kiddo’s name on the top of their jar, so there were no mix-ups.  It was really easy and completely free, since I had all these supplies lying around the house.  Henry even helped cut out the circles.

I plan to just swap out the paper circles and straws for the next party.

Categories: DIY, Simple Living, Thrift | Tags: , , , , , , | 15 Comments

Handmade Halloween – No Sew Pterodactyl Tutorial

Last year I posted two Halloween costume tutorials and they were a big hit.  In fact, they’ve been the biggest hits on this blog for the last month or so.  But last year, the costumes were easy.  E was a garden gnome, and H was a bat.  This year, H upped the ante – he wants to be a pterodactyl.

A pterodactyl.  Seriously.  How am I supposed to make that?!  H certainly keeps me on my toes.  Here’s what we came up with.

You’ll need:

  • a large piece of poster board
  • approx. one yard of fleece fabric (or an amount that will fit your kid’s arm-span)
  • hot glue gun and glue
  • scissors and hole-punch
  • duct tape, preferably in a fun color
  • five 9″x12″ pieces of felt in a variety of colors.  I used 2 red pieces, 2 orange pieces and 1 yellow piece.  These are not pictured.
  • a helper who wants to be a pterodactyl

Originally I was going to use spray paint to decorate the costume, but after trying it on some scraps, I decided to go with felt instead.  Just disregard that can of paint there.  😉

So, the Ptutorial:

Roll the poster board into a cone shape, centering the bottom point over your kiddos eyes and making sure he can still see.  Tape the cone so that it will be the correct size to fit his head.  This will be sort of a hat.  A cone-hat.  It’s ok if there is a little wiggle room, since you will be making ties that will be on the inside of the cone-hat.


Punch two holes in the cone-hat near your kid’s ears, using duct tape to reinforce them (the holes, not the ears).  Keep in mind that the back of the cone-hat is heavy, so the holes will need to be in a place that will keep it balanced on his head.  Also keep in mind that he has hair under the cone-hat where you are punching the holes – unless you want to give him a weird hole-punch hair cut.  Yep, that’s the way we roll.

Cut the salvage edge off your fleece.  Cut this strip in half.  Cut one half in half again, and set the other half aside.

Thread the two pieces of the first half through the holes in the cone-hat.  Knot them on the outside.  Use a piece of duct tape to secure the knots to the side of the hat, so they will be as flat as possible, but won’t slip through the holes.


Wrap the tip of the cone-hat in duct tape.  Extend the tape past the end of the cone and give it a bit of a curve.

Cut your fleece in half along the fold so that you have two relatively square pieces.  Mine were each a yard long.  Use one piece to wrap your cone-hat.  I let a bit hang over the edge in the back of the hat, so none of the poster board would show.  Use the hot glue gun to secure the fleece to the poster board, trimming off any excess fleece as needed, and making sure your curved duct tape tip pokes through the top.


Where the fleece overlaps the point on the front of the hat, fold it over and glue it to the underside of the poster board with the glue gun.

Your hat should now look like this:

Set your hat aside and have your kiddo lay down on the second piece of fleece. I took this picture and then decided to turn the fleece the other way, 90 degrees.  So the wings will be wider, rather than longer.  Make sure your kid is at the very top of the fleece, and then mark where his armpits are and cut two slits in the fleece, about two inches long.  Fleece is very stretchy, so don’t cut these too big, or too close to the edge.


About two inches in from the edges (where his hands would be) cut two more slits about an inch to an inch and a half apart for each hand.  Again, not too big, they will stretch.

Cut the bottom of the fleece into a wing shape.  Folding it in half makes it symmetrical.


Have him put his arms through the armpit holes like he was putting on a jacket, then his hands through the hand holes so that his wrists are through and he can grip the fleece in each hand.  Now, measure where his waist is and cut two small slits about two inches apart in the center of the wings.  Thread the second half of the salvaged edge strip through these holes so that the long ends can tie around your kid’s waist.

The wings should now look like this (H is holding them up – not wearing them yet):

Now, using the felt, make dinosaur-like designs to decorate your wings and hat.  This is easy, since no one knows what dinosaurs really looked like!  We did these oval, spot thingies for the back/outside of the wings.


And wavy, red and orange stripes for the front/inside of the wings and for the hat.  Attach all your felt decorations with hot glue.

Now, dress your kid in some dinosaur-hue clothing appropriate for the weather where you trick-or-treat.  We used brown pants that we already had, and a greenish shirt.  If I can track one down before the 31st, I might have him wear a yellow shirt instead, because every knows pterodactyls wear yellow shirts

Have your kiddo thread his arms through the wings, tie his belt (under his shirt), and tie on his hat.  Notice that I covered the back of the belt with a dino-spot.

Voilà – pterodactyl!

Ka-kaw, ka-kaw!

Happy Halloween!

Oh, and if you are like me, you should just buy double the fleece you need, because you are going to make the first wings too small.  But this is actually a good thing, since all pterodactyls live in family groups…

Categories: DIY, Thrift | Tags: , , , , , , | 9 Comments

DIY Pallet Compost Bin

This weekend Rick and I decided to move our compost bin.  Rick built it last year out of seven pallets he was able to scavenge.  I looked through all my old photos and posts and can only find a few random pictures with it in the background and no photos of its construction.  But that’s ok, because it wasn’t that great.

I mean it worked, we had two full wheel barrows full of compost (we put it in the neighbor’s garden), but the bin was poorly located, and too hard to move.  First off, we put it too close to the house.  It was really convenient for taking compost scraps to the bins from the kitchen, but it did attract some mice which wanted to move right in next door (in our house) when the weather turned chilly.

Basically the old bin was a two-bin system.  One side held compost that was almost ready and we added scraps to the other side.  Two of the pallets were hinged so we could open the bins and rotate things around as needed, but the whole thing was a bit unsteady and just awkward.  Here’s the best picture of it that I could find (that’s our neighbor, Haylee, in front of it helping Henry with his garden last spring).  See the vertical boards back there?

So when we tried to move it, it was all wobbly and heavy and kinda… well, you get the idea.  We decided we needed something better.  We built the bin Sunday afternoon reusing some of the same pallets and some scraps of lumber we had in the garage.  The new bin, with horizontal side boards, is in the chicken yard where they can have easy access to the goodies it will contain, and if it attracts mice, the chickens will take care of those for us too.  We’ll most likely build a second bin next to this one, as it was really easy (and we also generate too much yard waste for just one bin).

Here’s what we came up with, along with a “How-To” incase you want/need to build your own.

The design is based on a New Zealand Hot Box, modified to reuse the pallets we already had.  It’s roughly 3 feet high and about 4 feet square.  The size is, of course, dependent on the pallets you have.

Materials Needed:

  • (3) pallets in decent shape. Try to find ones with the top deckboards closer together, not further apart.
  • (4) 3′-6″ 2×2″ pieces of lumber.  We ripped a leftover cedar 4×4 post into fourths lengthwise.
  • At least (18) screws
  • (6) 1×6″ boards, approx. 4′ long each.  We had leftover fence pickets this size.  You could use (9) 1×4’s instead.
  • a saw, claw hammer, drill, measuring tape, sledge-hammer and helper

Directions:

Photo A

  • Use a hammer to knock the bottom deckboards off of the pallets.  Click on Photo A to see labeled parts of the pallet.
  • You may also have to saw the center projection of the runner boards off on the sides of the pallet that will become the back of the bin.
  • Using the saw, cut the ends of the 2×2″ stakes into a point.  These will be driven into the ground.  Two stakes will be used as corner stakes in the rear.  The other two will support the sides and make slots for the front boards.  See Photo B.
  • Photo D

    Photo C

    Measure the length of the pallet you plan to use for the rear of the bin.  With a helper drive a stake into the ground about 6 inches on each side of the rear. The stakes should be on the outside edge of the pallet.  Screw the rear pallet’s runners to the stakes (Photo C).  The wood on the pallets we used was quite hard, so we had to drill pilot holes first.

  • Have your helper hold the one side pallet in place while you measure and drive in the front support stake, making sure the side pallet is square to the rear.  The front support stake should be inside the pallet, butted up against the top deckboards and about 1 to 1½ inches from the runner that will be the front of the bin (Photo D).  Screw the side pallet’s runner to the back corner stake (again the rear stake should be on the outside edge of the pallet).  Repeat with the other side, making sure it is also square to the rear.
  • Photo E

    Finally measure the distance between the two side pallets.  This will be the length you will need to cut the 1×6″ boards into the removable front slats.  Fill your bin with compost and slide the slats into the slot created between the front support stakes and the front runners on the side pallets (Photo E).  These slats can be removed when you want to turn the pile or use your compost.  These bins are easy to make and if you want a second or third bin to rotate your compost, it would be very easy to build additional bins adjacent to the first.

To see more of my Do-It-Yourself projects click the DIY category on the right.

Categories: Compost, DIY, Garden, Sustainability, Urban Homesteading | Tags: , , , , , | 12 Comments

Handmade Halloween – Bat Tutorial

Since last week I posted a tutorial for sewing a homemade garden gnome costume, I thought I’d share how I made H’s bat costume for this Halloween as well. This costume was also very inexpensive to make, and very easy.  It took me about 2 hours total, including trying to keep E distracted from pushing the stitching buttons on the sewing machine and away from the straight pins. Click the pictures for close-up views.

I started with a black jacket from Goodwill ($1.99) and took it with me to the fabric store.  Using the jacket as a reference, I bought 3/8 of a yard of black felt ($1.58) .  With the material folded in half, I had H lay on the felt with his arm outstretched and used straight pins to mark his wrist, elbow, armpit and waist.

Cut a wing shape using these measurements.  You could mark the felt with chalk, make a paper template, or freehand it (I just eyeballed it).  With the jacket zipped up, pin felt to the arm and side seam of the jacket.  Flip the jacket over and trim away any extra felt.  (I love that this jacket has a reflective patch on the back hem – good for trick-or-treating).

Unpin the felt from the jacket, but keep the pin marking the elbow in place.  You now have one wing that is two pieces of felt.  Use this as a guide to cut another two pieces of felt for the other wing, and mark where the elbow will be on the second wing.

Working with one wing at a time, twist together some pipe cleaners (77 cents for 25).  I used seven for each wing.  Center the… uh, stem(?) of the pipe cleaners at the pin that marked the elbow, between the two layers of felt.  Pin the pipe cleaners in place.

Bend pipe cleaners so that they make lines out to the points of the wings and pin securely between felt pieces.

Top-stitch both pieces of felt together, starting with the outside edges.  Then top-stitch on either side of each pipe cleaner. It might be fun to use contrasting thread so you can see the stitching.  Repeat this on the second wing.

Now you will secure the wings to the jacket.  You could sew them in place, use hot glue, or if you want to reuse the jacket later, use safety pins.  I used safety pins.  I pinned the jacket at the wrist, elbow, armpit, waist and hem.  Then I had H try on the jacket, adjusted the wings as needed and added more safety pins.

For the bat ears, I cut two pieces of felt in the shape of an ear.  Make sure they are big bat ears, not little cat ears!  You could do double layers of felt, top-stitched together here too, but I was running out of nap time and patience with Emmett, so mine are only one layer thick.  Pin and stitch pleats into each ear.  You might want to experiment with one or two pleats, etc.

Pin the ears to a black knit hat ($1.50 new).  Flip the hat over a stitch the ears on.  Alternatively, you could hot glue or pin the ears in place.

Ta-da!  A bat costume for $5.84 plus tax.  If you’re keeping tally, that’s $9.53 for two Halloween costumes this year.  If you could find a black hoodie at Goodwill instead of a jacket and a hat, that would save you even more.

When the 31st rolls around, H will wear his costume with black pants too.  He loves his costume – just what he wanted.  What are you doing for Halloween?  Do you dress up?  Are you making homemade costumes?  Carving pumpkins?

Note:  Please feel free to share this tutorial on your own blog, just include a link back here!  Thanks!

Categories: DIY, Thrift | Tags: , , , | 12 Comments

Handmade Halloween – Garden Gnome Tutorial

Last year, we found the funniest costume and we really wanted it for E (who has earned the nickname “Angry Elf”).  But we couldn’t find it in E’s size.  This year, Target is carrying the costume – for $20.

Basically these are brown and plaid, super-thin pajamas with a felt hat, fake beard and felt booties.  TWENTY dollars!?!?

So, I tried my hand at making it myself.  E already had hand-me-down green corduroy overalls and a red plaid shirt from H, so that part was easy.  Turns out, the rest was easy too.  Click the pictures for a closer view.

I got four pieces of 9×12″ felt for a dollar at Hobby Lobby.  Make that seventy cents – since it was my lucky day and the felt was 30% off.  And a piece of white craft fur for $2.99.

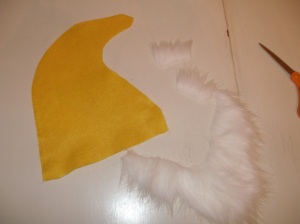
Step one: using two pieces of felt, trace and cut out hat shape.  Make sure to leave a seam allowance and that the brim will fit your babe’s noggin, plus a little wiggle room since the beard will be sewn into the hat.  I had to sew in little extra felt triangles since E needed just slightly more than 18 inches (pictured later).  Trace a beard shape on the back of the craft fur and cut out.  I suggest making the beard at the bottom of the piece fur so that you won’t accidentally cut the hair that hangs down at the bottom too short.

Step two: Cut two eyebrows from scraps of the craft fur.  Trim them to be a bit shaggy and then pin them to the front of the hat.  Sew eyebrows on.

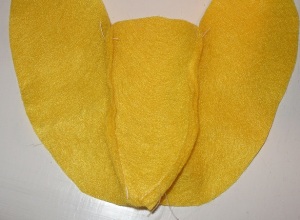
Step three: If you need to add a bit of felt to make the brim fit your little one’s head, sew triangles to the back piece of the hat.  You can see my little triangles already attached where the beard is pinned.  Cut a six to seven-inch piece of thin elastic (I had some of this left over from a earlier project).  Center, pin and sew the elastic to the inside of the back hat piece.  Pin and sew the beard ends to the ends of the elastic.  Note that I sewed them as shown in the picture, but if I had a do-over, I’d turn the beard ends out before sewing them on so they’d lay more naturally when the hat is worn.  Details, people.  😉

Step four:  Pin the right sides of the hat together, sew and trim up any threads.  Turn right side out.  Voilà!

For the shoes, trace and cut a sole, a tongue and two sides of a shoe that will fit your kiddo on two pieces of felt (or on one piece and cut both pieces at the same time).  Give the sides a nice curl, so when it’s put together the toes will curl a little.  Cut two 1.5-2-inch pieces of thin elastic.

Sew the backs of the shoe sides together, right sides out/wrong sides together.  The seams should be showing on the outside of the shoe.  Next sew the elastic to the inside, centering with the center of the back of the shoe.  Then sew the sides to the tongue, again, wrong sides together.

You’ve just made the “upper” of a felt elf shoe.  Although, the story books would usually have it happen the other way around… the old shoemaker would be proud.  At any rate, they should now look like sole-less shoes.  Pin the soles to the upper, again, with the seams showing on the outside.  Sew the soles on.

All done.  Little gnome shoes.  Not the best to use in a house with hardwood floors, unless your gnome can’t walk.  But they will do for one night on the streets, begging for candy and creeping out old people.

Finally, dress the Angry Elf as a happy garden gnome.  And laugh all the way back to Target to return that ridiculously over priced costume.  You just made yours for $3.69 plus tax.

Note:  Please feel free to share this tutorial on your own blog, just include a link back here!  Thanks!

Categories: DIY, Thrift | Tags: , , , , | 18 Comments

Create a free website or blog at WordPress.com.