Boot camp is back in session. And I have a confession to make. I love compost. I mean I really, really love it. I love the whole process of it. I find it completely fascinating. Compost is so awesome. Completely dreamy, in fact. I might be obsessed.
The run down… you should compost. Here’s why:
Compost builds up your soil. There is a reason it is called “black gold.” It provides good organisms, holds water, gives nutrients, improves clay soils, improves sandy soils, kills pollutants, fertilizes. It is awesome. Using compost reduces the amount of water, fertilizer, pesticides, and soil modification needed to grow a great garden.
Compost gets rid of your waste. Basically, most things that can’t be recycled can be composted. If it was alive or came from something that was alive, you can compost it. Food waste, paper, yard waste, hair, wood, natural-fiber cloth, cardboard, even meat (but you’ll want to do it right). We’ll call all these things “organic waste” for the purpose of this post. The only things that can’t really be composted are plastics, disposable diapers, and other synthetic materials. Although bones can be composted, they will take a longer time than most gardeners want to put in, or are more likely to get stolen from your pile by some critter.
Seriously, what is cooler than something that turns all of a household’s non-recyclable waste into something that isn’t waste at all? Something that gives back, that makes the gardens better? Can you see why I’m infatuated?
How does it work? Well, here’s the quick and dirty version (tomorrow, I promise a bit more detail):
Compost turns trash into treasure by rotting. Yep. Rot. Experts talk about the greens and the browns, but the bottom line is that a compost bin uses water, heat and air to decompose all those vegetable peelings, coffee grounds, egg shells, grass clippings, leaves, straw, chicken poop, etc. What you need is a place to put it and a way to turn it to get air into it.
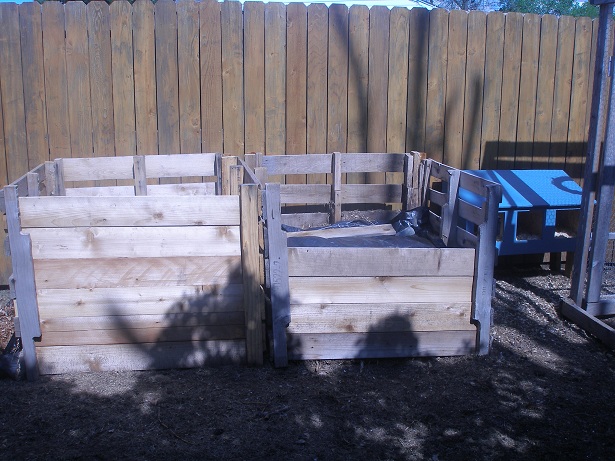
Large bins are great if you have a family, a large garden or a large amount of organic waste to compost. We don’t have the biggest yard, but we have two pallet bins in the chicken area that we use for composting. You can make your own, or buy a variety of bins that range in size from pretty moderate to very large. Some even turn themselves.
*Note: Amazon links connect to Northwest Edible’s affiliate links – Help a garden blogger out!
Or, skip a bin all together and just have a designated pile.
You’ll want to place your compost bin(s)/pile somewhere that gets some sun during the day and where you can get water to it. A great place is in your garden so that you won’t have to go far with your finished compost. Close to the kitchen is nice too, so it’s easy to fill, but you really don’t want it right up next to your house. Trust me. Our first bin was next to the house and we had a mouse invasion in the fall. Now our bins are out in the chicken area. Which is not close to the garden or the kitchen, but it is convenient for cleaning out the coop. (Yep, broke all the rules I just mentioned. That’s the way we roll). It should also be free-standing; not up against a wall or a fence.
If you have a very small area, say only a patio or balcony, you might want to consider vermicomposting. That is composting with worms. They are a specific kind of worm, red wigglers, and they can live in a small box (or a big one) and they can eat through your kitchen waste pretty darn quickly. Their bins can be really small and stacked, and I’ve even seen some that are topped with planters (double duty!). They don’t need to be turned and they don’t need much “brown” material, but you do need to maintain them (you want the worms to stay alive). Plus then you have little wiggly pets. There are many different towers that you can buy or you can DIY with a plastic storage bin or wood. Check YouTube for a bunch of tutorials.
Worms make excellent compost tea, which is a superb fertilizer that, once diluted, you can pour into your garden beds to help your plants. Think of it as natural Miracle-Gro. You can have a worm bin indoors as well.
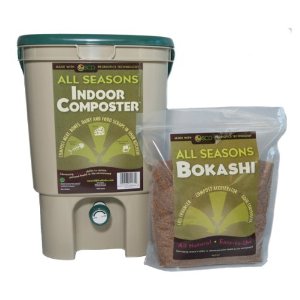
If the only place you have to compost is under your sink, or if you think you need a way to compost meat or dairy, you might want to consider a Bokashi. I don’t have any hands on experience with one (we toss any extra dairy or meat scarps to the chickens… except chicken, of course), but they are pretty ingenious. They are small and air tight, so there is no smell and they use probiotics (the good micro organisms) to decompose what you put in there. They don’t hold a ton, but they are efficient and get you compost tea quickly.
Tomorrow, I’m going to cover what to put in your compost (you know, “greens” and “browns” and all that), plus the difference between cool and hot composting.
Since I do all of our composting outside, I’d love to hear your experiences and thoughts on vermicompost and the Bokashi methods. Tell me, tell me!


The all-seasons indoor composter in the picture is the same one that I have! I got it for Christmas and I’ve been using it ever since. It really doesn’t smell at all but even for a household of just two people, it fills up very quickly. I sloshed it around this weekend and there already tea in the bottom. My main complaints with it are 1) it’s too small 2) I’m not wild about having to buy more Bokashi when I run out. I was thinking about composting in batches and transferring the more broken down stuff to a bigger container but I live in a condo with an itty bitty porch in the back so I don’t think my neighbors would entirely appreciate it.
What about using a little good healthy soil to supplement the Bokashi? The organisms should be getting into the soil and taking care of business, no?
Never thought of that. I’ll give it a try! My Bokashi bag is ominously low. Dun dun dun…
We’re huge advocates of vermicomposting in Somerville, MA because so few people have back yards in our community. It’s an awesome way to reduce trash and make great fertilizer. We even sell worms where I work, Groundwork Somerville, with great success!
Pingback: Composting Basics Part II: Hot, Cool, and Greens vs. Browns « The Lazy Homesteader
We’ve been composting for a while with worms and love it. They are incredibly easy to care for, and their compost is incredible. It’s also great to see the look on your guest’s faces when you tell them you have a bin full of worms in the pantry.
My other half wrote a tutorial on vermicomposting here (Picture of baby worm included) – http://spacefarms.wordpress.com/2012/01/29/eisenia-fetida/
When we get chickens this year they’re going to have to battle the worms for food scraps 🙂
Pingback: Remedial Composting « The Lazy Homesteader
Pingback: Homestead Garden Tour – May 1, 2012 « The Lazy Homesteader