This weekend Rick and I decided to move our compost bin. Rick built it last year out of seven pallets he was able to scavenge. I looked through all my old photos and posts and can only find a few random pictures with it in the background and no photos of its construction. But that’s ok, because it wasn’t that great.
I mean it worked, we had two full wheel barrows full of compost (we put it in the neighbor’s garden), but the bin was poorly located, and too hard to move. First off, we put it too close to the house. It was really convenient for taking compost scraps to the bins from the kitchen, but it did attract some mice which wanted to move right in next door (in our house) when the weather turned chilly.
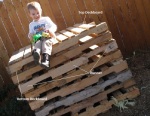
 Basically the old bin was a two-bin system. One side held compost that was almost ready and we added scraps to the other side. Two of the pallets were hinged so we could open the bins and rotate things around as needed, but the whole thing was a bit unsteady and just awkward. Here’s the best picture of it that I could find (that’s our neighbor, Haylee, in front of it helping Henry with his garden last spring). See the vertical boards back there?
So when we tried to move it, it was all wobbly and heavy and kinda… well, you get the idea. We decided we needed something better. We built the bin Sunday afternoon reusing some of the same pallets and some scraps of lumber we had in the garage. The new bin, with horizontal side boards, is in the chicken yard where they can have easy access to the goodies it will contain, and if it attracts mice, the chickens will take care of those for us too. We’ll most likely build a second bin next to this one, as it was really easy (and we also generate too much yard waste for just one bin).
Here’s what we came up with, along with a “How-To” incase you want/need to build your own.
The design is based on a New Zealand Hot Box, modified to reuse the pallets we already had. It’s roughly 3 feet high and about 4 feet square. The size is, of course, dependent on the pallets you have.
Materials Needed:
- (3) pallets in decent shape. Try to find ones with the top deckboards closer together, not further apart.
- (4) 3′-6″ 2×2″ pieces of lumber. We ripped a leftover cedar 4×4 post into fourths lengthwise.
- At least (18) screws
- (6) 1×6″ boards, approx. 4′ long each. We had leftover fence pickets this size. You could use (9) 1×4’s instead.
- a saw, claw hammer, drill, measuring tape, sledge-hammer and helper
Directions:
- Use a hammer to knock the bottom deckboards off of the pallets. Click on Photo A to see labeled parts of the pallet.
- You may also have to saw the center projection of the runner boards off on the sides of the pallet that will become the back of the bin.
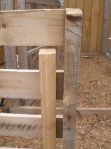
- Using the saw, cut the ends of the 2×2″ stakes into a point. These will be driven into the ground. Two stakes will be used as corner stakes in the rear. The other two will support the sides and make slots for the front boards. See Photo B.
-
Measure the length of the pallet you plan to use for the rear of the bin. With a helper drive a stake into the ground about 6 inches on each side of the rear. The stakes should be on the outside edge of the pallet. Screw the rear pallet’s runners to the stakes (Photo C). The wood on the pallets we used was quite hard, so we had to drill pilot holes first.
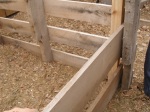
- Have your helper hold the one side pallet in place while you measure and drive in the front support stake, making sure the side pallet is square to the rear. The front support stake should be inside the pallet, butted up against the top deckboards and about 1 to 1½ inches from the runner that will be the front of the bin (Photo D). Screw the side pallet’s runner to the back corner stake (again the rear stake should be on the outside edge of the pallet). Repeat with the other side, making sure it is also square to the rear.
-
Finally measure the distance between the two side pallets. This will be the length you will need to cut the 1×6″ boards into the removable front slats. Fill your bin with compost and slide the slats into the slot created between the front support stakes and the front runners on the side pallets (Photo E). These slats can be removed when you want to turn the pile or use your compost. These bins are easy to make and if you want a second or third bin to rotate your compost, it would be very easy to build additional bins adjacent to the first.
To see more of my Do-It-Yourself projects click the DIY category on the right.


Hi
I am loving your compost bin info. I have three pallets so far, waiting to be made into a compost bin.
Off topic a bit. My grandmothers maiden name was Schell. She was born in Ontario Canada? Of course I’m wondering if you are related to us? It’s not really a common name.
Cheers, Erin
Hi Erin – try driving around industrial parks – they often leave pallets out for people to pick up!
Schell is actually pretty common here – no relation to your grandmother, I’m pretty sure. My husband’s family had been in Colorado an awful long time. We actually used to see someone with the license plate “SCHELL” driving around our old neighborhood!
Pingback: Composting Basics Part I « The Lazy Homesteader
Pingback: Composting Basics Part II: Hot, Cool, and Greens vs. Browns « The Lazy Homesteader
This DIY bin is an excellent idea and very practical, especially when *just* starting a garden! One of our (“our” meaning my husband and I) goals this year is to focus on becoming more self-reliant through sustainable living methods. Several books on organic gardening and urban homesteading are on their way, and I admit it’s a bit overwhelming with all the new info I’ve unearthed by visiting various sites and blogs. Hubby and I agreed that if we split the different facets of gardening, though, we’d have a better chance at making it. The majority of the actual vegetable gardening will be my responsibility and the compost his. Work delegated! 😉
Great plan! We work together too. I’m oddly addicted to compost. 😉
Pingback: Remedial Composting « The Lazy Homesteader
This is perfect! I want to make a compost bin out of pallets, but never thought about having the side come off like that. Genius. 🙂 Thanks for the great idea.
With just a couple of short 2x2s the panels on the front could become a gate that lifts out of the pocket made by the side stakes. It certainly wouldn’t be unmanageable in size or weight and much easier than stacking boards.
Thanks Keith – true, that would work, but an advantage of the boards is that it makes it easy to turn the pile – I can add one or two boards and toss stuff over, which is easier than tossing it over the full height.
Pingback: Yurto » » Five DIY Projects for Home Composting
Thanks for the “how-to”!
I live in Colorado too and am planning to build a pallet compost bin. With our dry weather, do you think lining the bin with plastic would be helpful?